Difference between revisions of "Delete Duplicate File GUI"
Russ hensel (talk | contribs) (Created page with "= Overview = The GUI or graphical user interface is the key to using the Smart Clipboard. Root doucmentation at: '''Python Smart ClipBoard''' This page is the documentat...") |
Russ hensel (talk | contribs) |
||
| Line 97: | Line 97: | ||
Configured by way of a file with the names and snippets, and a setting in parameters.py that names that file. You can easily change between sets of snippets. | Configured by way of a file with the names and snippets, and a setting in parameters.py that names that file. You can easily change between sets of snippets. | ||
| − | + | ||
| − | + | ||
| − | + | [[Category:Python DeleteDups]] [[category:Python]] [[category:Python Projects]] | |
| − | |||
| − | |||
| − | [[Category: | ||
Revision as of 09:46, 25 July 2021
Contents
Overview
The GUI or graphical user interface is the key to using the Smart Clipboard. Root doucmentation at: Python Smart ClipBoard This page is the documentation for the GUI.
A recent enhancement to the application is to give several different layouts of the GUI, this documentation is only for the default GUI, which is also in flux. Be flexible, this info. is still generally of use.
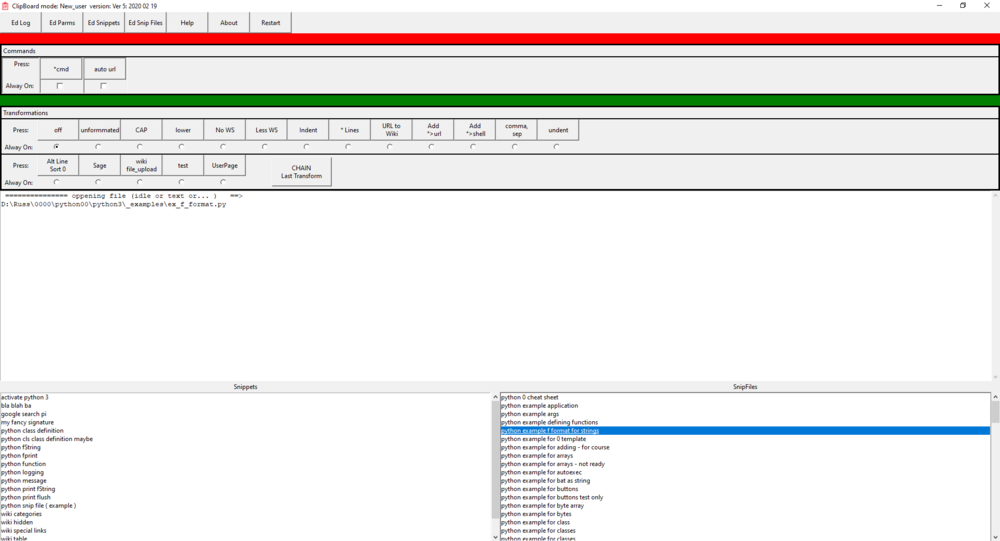
Screen Shot
This is what it looks like, details on each part below. Still working on it, mostly to clean up the details. Note that this screen shot was taken during a debugging session and has some artifacts that will soon disappear, then a new screen shot will be placed here.
What Does What
General
There are 4 major areas of functionality. Read this guide first then get more information on each at:
The Controls
Control is mostly through buttons. There are two lists at the bottom, clicking on one puts a "snippet" in the clipboard, clicking on the other opens a "snip file" in your system's editor. Outside of the GUI there is also a parameter file which controls start up, your preferred system editor, and many other setting.
Working from top to bottom:
At the Top
- <Window title> Program name and some additional info including version, mode, and the name of any "extra" parameter file ( see Smart Terminal Parameter Examples ).
- <ID Color Band >The red band under the title is an optional component, its height and color is set in the parameter file. It is normally useful only if you are running 2 similar looking applications and want a quick way to tell them apart.
Top Button Row
- <Edit Log> opens an editor on the system ( needs to be configured in parameter file self.ex_editor = <name of executable or link> ) to view the python logging file for the app.
- <Edit Parms > opens an editor on the system to edit the parameters.py file. See <Edit Log>.
- <Edit Snippets> ...
- <Edit Snip Files> ...
- <Restart> Restarts the application ( usually fast ) using new values ( if any ) in the parameter file(s).
- <Help> Will open some sort of help file, text, pdf, or url, depending on configuration in parameter file.
- <About> More or less standard help box.
- <Test> May not be present, for debugging, not generally useful or predictable, you would need to look through the code to see what it might be doing, press at your own risk.
Command Buttons
There is both a button and a check box, lets deal wit the buttons first ( note there may be one or more buttons depending on my current thinking about the application )
- <*cmd> look for a *>command in the text and execute if found. ( if none appears on line one it stops command processing ) For more information on what is a command see Clipboard Commands
Under each button is a check box. If checked the command action will be run each time the clipboard text changes. See Clipboard Commands
Transformation Buttons
The info here is just a summary, find more detail on Transformations at Clipboard Transformations
There are both a buttons and a check box for each button, lets deal wit the buttons first.
- <off> Do not do anything to clipboard text.
- <unformatted> Remove all formatting from text in the clipboard ( like rich text or html ) this gives you straight text.
- <CAP> Capitalize all text ( mostly for demo purposes, but you may find a use ).
- <lower> lower case all text ( mostly for demo purposes, but you may find a use ).
- <No WS> remove all white space. Result: one line with no white space. ( perhaps for removing spaces from file names )
- <less WS > all white space to spaces and multiple white space to a single space. Result: one line with at most single spaces
- <Indent> ...
- <*lines> ...
- <URL to wiki> ...
- <Add *>url> ...
- <Add *Shell> ...
- <comma, sep> ...
- <undent> ...
- <AltLine Sourt 0 > ...
- <Sage> ...
- <Wiki File Upload > ...
- <Test> ...
- < > ...
- < > ...
- < > ...
Under each button is a radio box. If selected the transformation will be automatically applied each time the clipboard text changes.
Snippets
The info here is just a summary, find more detail on Snippetsat Clipboard Snippets
A line here is the name you can give to a bit of text called a "snippet". Click on the name and the corresponding text is placed in your clipboard. Configured by way of a file with the names and snippets, and a setting in parameters.py that names that file. You can easily change between sets of snippets.
